
|
|
|
|
1. Go to Verisign's Digital ID renewal page by copy/pasting the following link into your browser https://digitalid.verisign.com/services/client/renew.htm
|
|
|
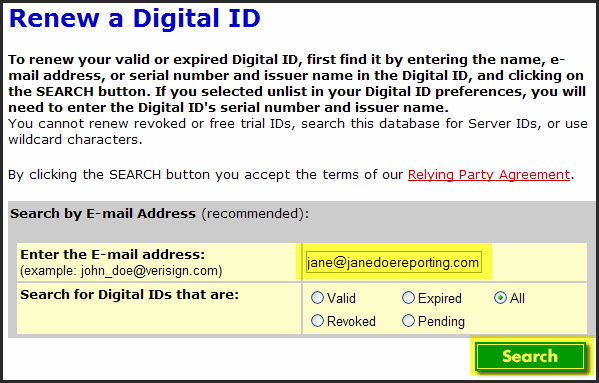
2. Type in your email address and then select the Search button.
|
|
|
|
|
|
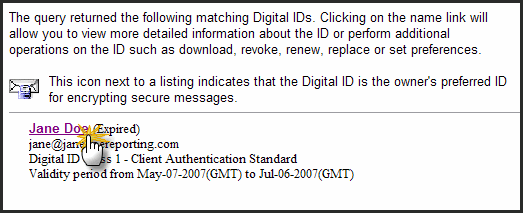
3. Click on your name.
|
|
|
|
|
|
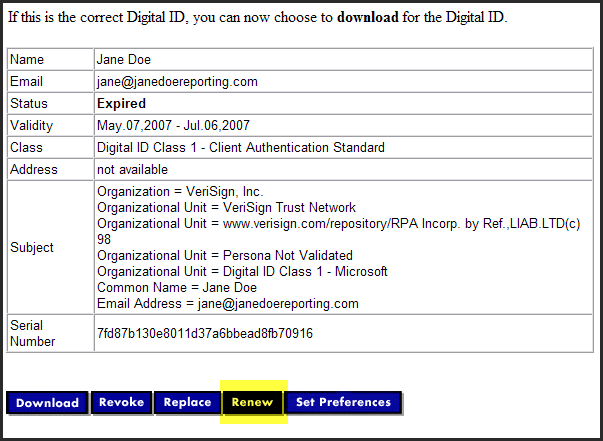
4. Select the Renew button.
|
|
|
|
|
|
5. Type in your challenge phrase & select the Renew This Digital ID button.
|
|
|

|
|
|
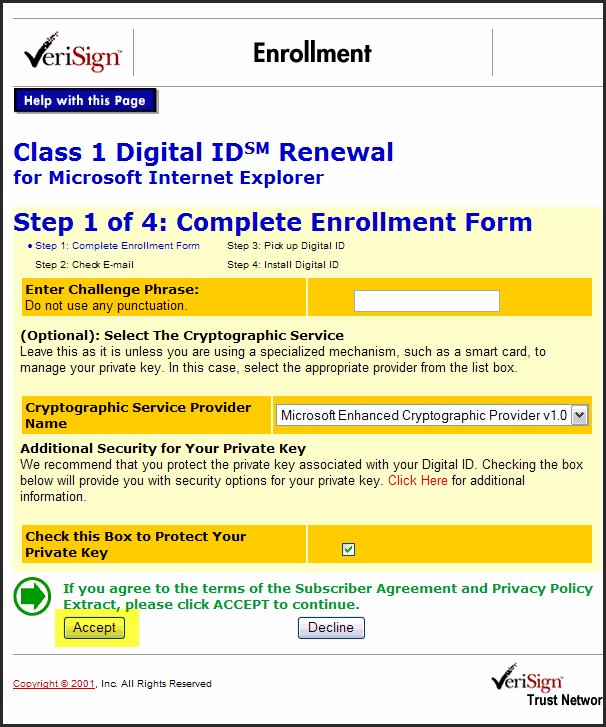
6. Fill out the Digital ID Renewal Enrollment Form. Checking the box to Protect Your Private Key is recommended. Select the Accept button.
|
|
|
|
|
|
7. Select Yes if you trust the VeriSign website to install your digital ID.
|
|
|

|
|
|
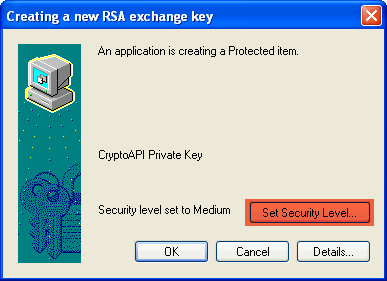
8. Select Set Security Level... button.
|
|
|
|
|
|
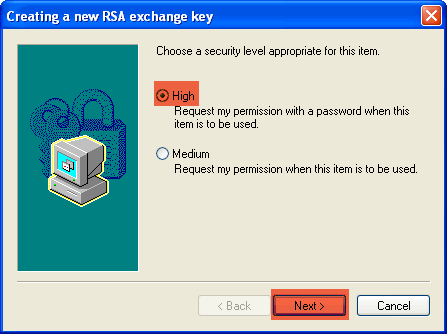
9. Select secuirty level High and select Next.
|
|
|
|
|
|
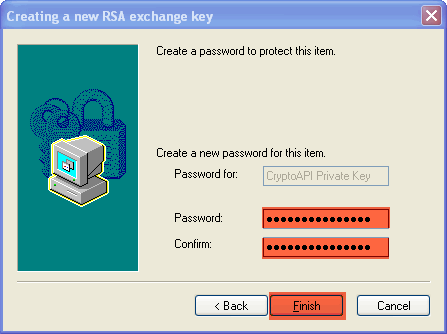
10. Enter your password (a.k.a. private key) in the text boxes and then select Finish. This will become your pdf-it "signature" password.
|
|
|
|
|
|
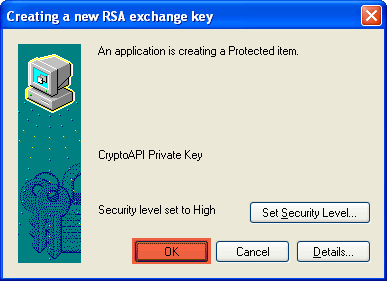
11. Select OK.
|
|
|
|
|
|
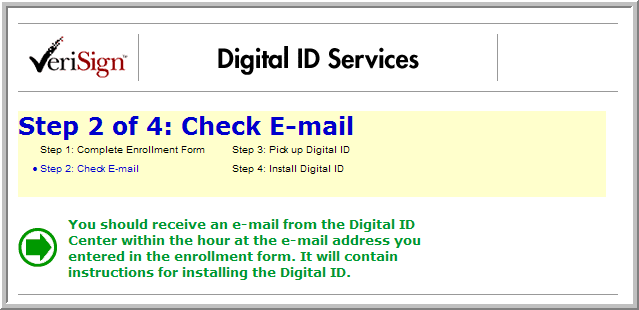
12. You will see a screen telling you to expect an email to continue the process.
|
|
|
|
|
|
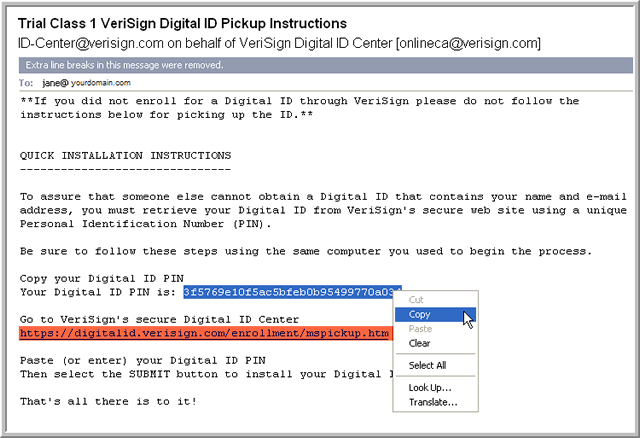
13. Go retrieve your email from VeriSign. Highlight the Digital ID PIN. Right mouse click and select Copy. Select the hyperlink provided in the email.
|
|
|
|
|
|
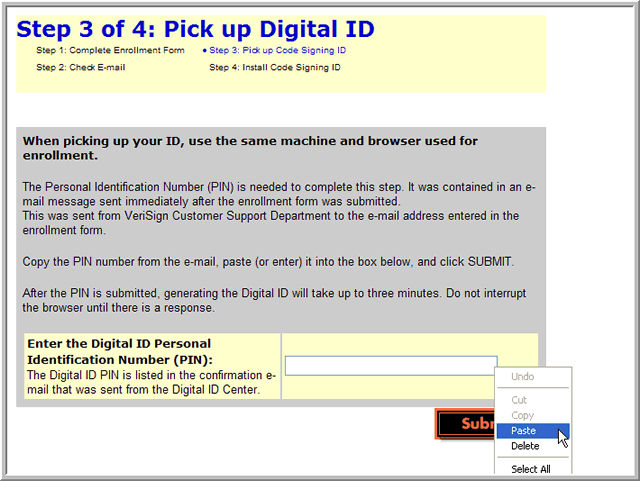
14. Click inside the text box for your Digital ID PIN and right mouse click and select Paste. Then select Submit.
|
|
|
|
|
|
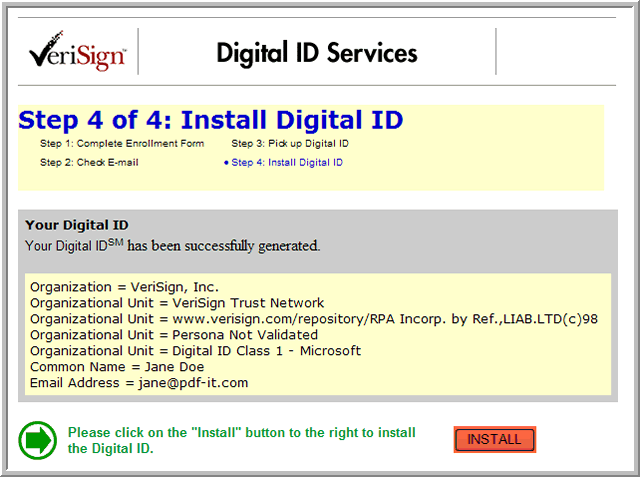
15. Select Install.
|
|
|
|
|
|
16. Select Yes twice if you trust the VeriSign website to install your digital ID.
|
|
|

|
|
|
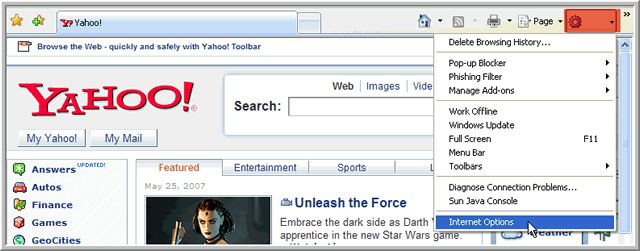
17. Launch your Internet Explorer browser (Version 7 illustrated). Select Tools on the tool bar and then select Internet Options.
|
|
|
|
|
|
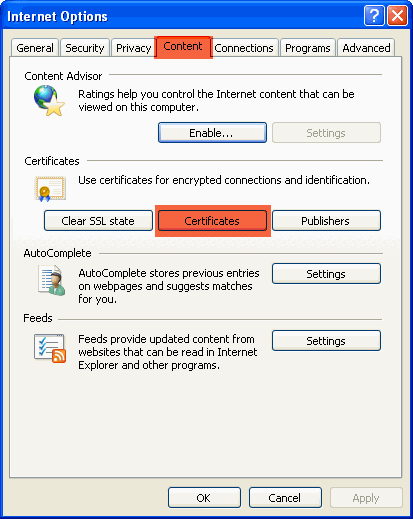
18. Select the Content tab and then select Certificates.
|
|
|
|
|
|
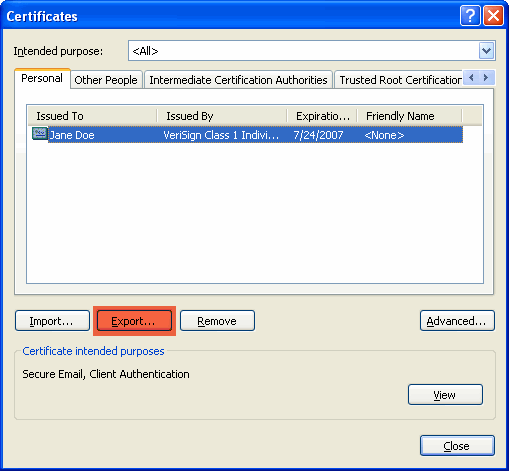
19. Select the row with your digital ID (Certificate) information and then select Export.
|
|
|
|
|
|
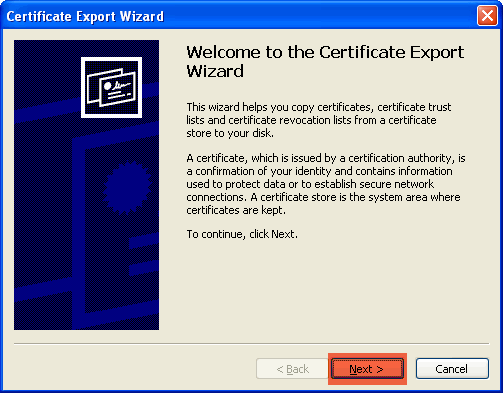
20. Select Next.
|
|
|
|
|
|
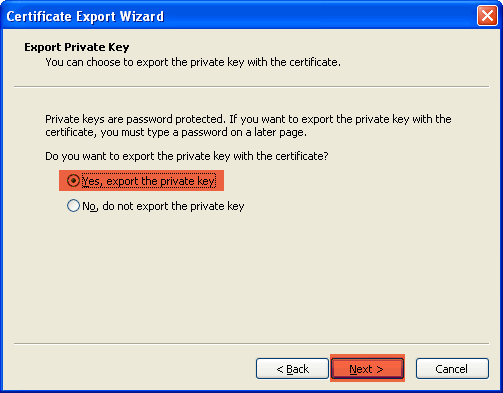
21. Select Yes, export the private keyand then select Next button.
|
|
|
|
|
|
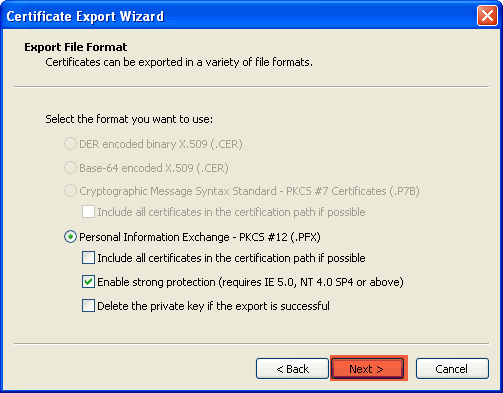
22. The defaults are fine so select the Next button.
|
|
|
|
|
|
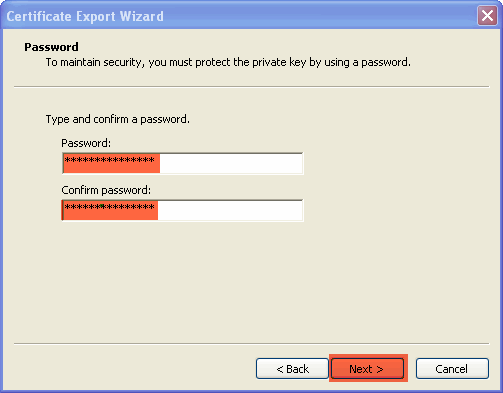
23. Type in a password twice and select Next. Keep this password confidential. This will become your pdf-it signature password and will be needed every time you apply your digital signature. Select the Next button.
|
|
|
|
|
|
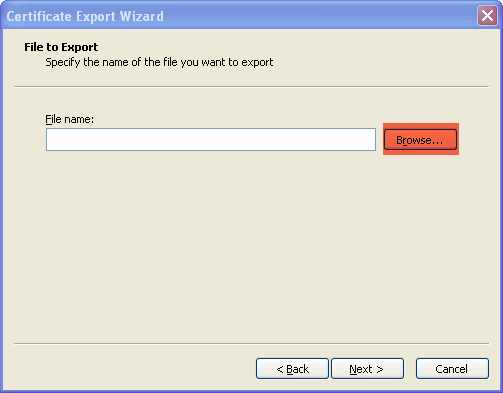
24. Select the Browse... button.
|
|
|
|
|
|
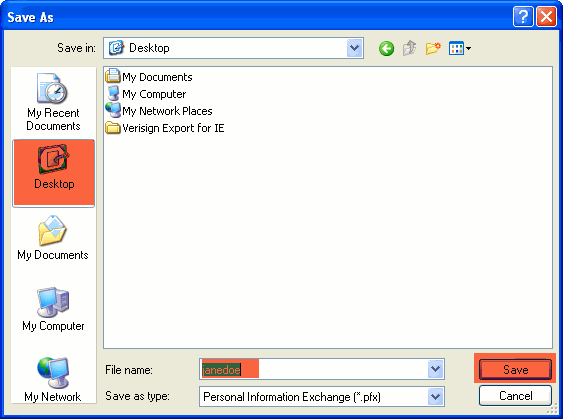
25. Select the Desktop icon, type in a file name of "VeriSign" and select Save.
|
|
|
|
|
|
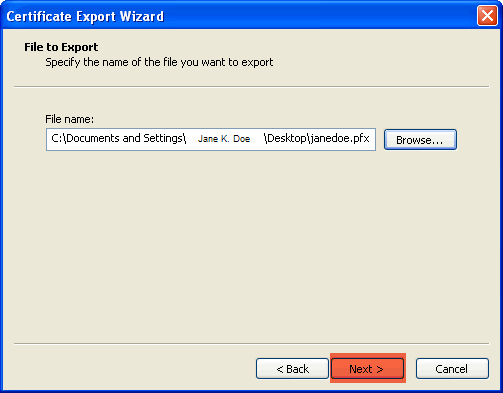
26. Select the Next button.
|
|
|
|
|
|
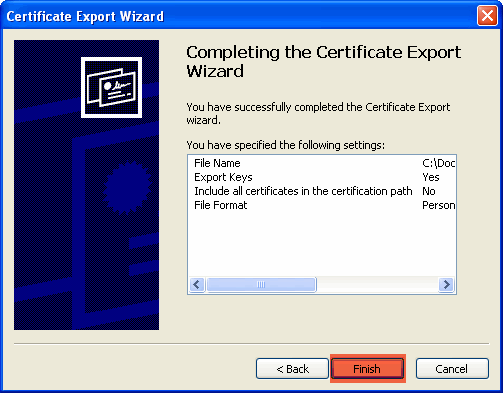
27. Select the Finish button.
|
|
|
|
|
|
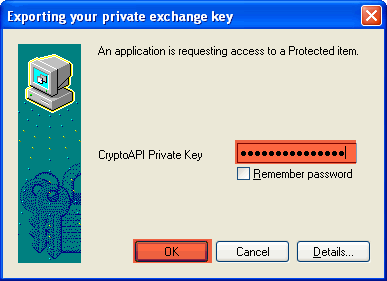
28. Type in your Private Key (this will be the password created in step 10). Select the OK button.
|
|
|
|
|
|
29. You should receive an alert box notifying you of a successful Digital ID exportation. Select the OK button.
|
|
|

|
|
|
30. Login to your pdf-it account and select Modify your pdf-it profile or click on the picture.
|
|
|

|
|
|
31. Select the Transcript Signing tab.
|
|
|

|
|
|
32. Select the Browse button next to the Certificate text box.
|
|
|

|
|
|
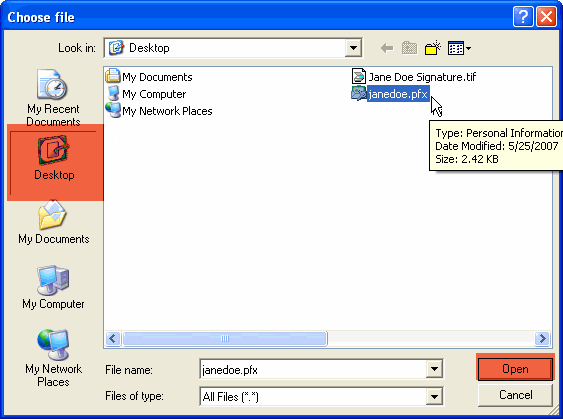
33. Select the Desktop icon. Find the "VeriSign" file and then select the Open button.
|
|
|
|
|
|
34. Select the Save button on the bottom, right side.
|
|
|

|
|
|
35. The message "Your changes have been saved" confirms success.
|
|
|

|
|
|
End of Instructions.
|
|